Wide-Angle Macro Photography with Compact Cameras
By Xander Water
Underwater photographers often encounter the same problem before a dive—choosing between wide-angle and macro. But why not do both at the same time? Wide-angle macro (or WAM) is a photographic technique that combines a foreground macro subject with a wide-angle background showing the subject’s surroundings.
In some ways it’s similar to close-focus wide angle (CFWA) but more extreme: Instead of shooting medium sized subjects, you can capture wide-angle images of traditional macro critters. It is a great technique for telling a story with your image and capturing dramatic scenes.
Emperor shrimp on a cucumber, Ambon, Indonesia. The shrimp was almost touching my mini dome. Panasonic Lumix DMC-GH4, 8mm lens, 3.5” dome
A blue swimmer crab warns me to stay away, Western Australia. Panasonic Lumix DMC-GH4, 8mm lens, 4.33” dome
Equipment
To take a WAM photo, you need a wide-angle lens that lets you focus very close, preferably as close as the lens or dome port. While DSLR fisheye lenses and compact dome ports do allow photographers to focus with almost no focusing distance, they are much bigger and cumbersome than compact or mirrorless cameras. In this way, compact cameras have an edge when it comes to WAM—they can fit into tight spaces more easily than larger DSLRs.
To shoot WAM on a compact camera, as well as the camera itself, you’ll need a wide-angle fisheye wet lens. High-end compacts like the Sony RX100 line offer DSLR-esque image quality, which is great for capturing all of the details in the background. For the fisheye wet lens, the better the optics and glass quality, the sharper your corners will be. This is especially important with WAM, as you’ll be squeezing a tiny subject into the middle of the frame. I recommend the iTorch UWL-04 lens, which offers sharp corners with a 168-degree field of view.
We can also extend “compact” wide-angle macro to mirrorless cameras, because of their relatively compact size. Pair a fisheye lens (like the Panasonic Lumix G Fisheye 8mm) on a mirrorless camera with a mini dome port. If you use an interchangeable lens behind a dome, then you need a dome that is as small as possible—a centimeter closer to the subject can make all the difference. I have achieved good results using a Nauticam 3.5-inch mini dome.
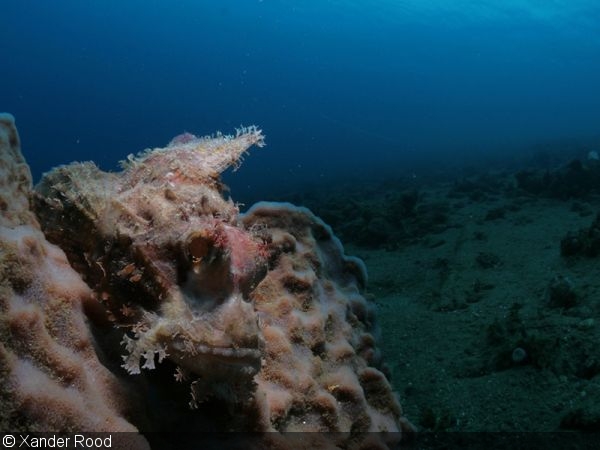
Scorpionfish resting on a sponge, Ambon, Indonesia. Panasonic Lumix DMC-GH4, 8mm lens, 3.5” dome, snooted
Ornate ghost pipefish, Ambon, Indonesia. Panasonic Lumix DMC-GH4, 8mm lens, 3.5” dome
Wide-Angle Macro Subjects
A successful WAM photo is very dependent on finding the right foreground macro subject. Since you’re positioning the camera so close to the subject, you need to find one that is not skittish, does not move, or is slow-moving. This can require patience and recognizing when it’s time to move on from an uncooperative subject. In terms of size for a wide-angle macro subject, the range is quite broad--anywhere from less than an inch (shrimp, gobies, blennies) to a foot or larger (scorpionfish or frogfish). If the subject is too small in the frame, it will get lost in the distracting scene. However, subjects larger than a foot may take up the whole frame, hiding the background.
If you’re just starting to learn how to capture WAM subjects, start out with ones that basically don’t move, so you can focus on your camera settings and lighting. In tropical waters, such subjects include starfish, nudibranchs, or even Christmas tree worms. Once you feel confident in your ability to properly expose and frame your WAM subjects, you can begin trying to capture more fickle critters like seahorses, scorpionfish or shrimp.
Longhorn cowfish, Bali, Indonesia. This boxfish finally checked out my dome after a 30-minute wait. Canon PowerShot S95, UWL04 wide-angle lens
My experience is that with many of these subjects, it comes down to patience and luck. For example, many seahorses will show you their back if you come too close, but sometimes you can be lucky and find one that does not seem to care. Patience is always a good thing: Giving an animal its space and letting it get used to your presence can be very rewarding.
You’ll also want to think about the background, not as just something that happens to be there, but as a secondary subject in the frame. Indeed, the environment behind the critter can be just as important as the foreground subject. Sometimes a beautiful background can make the photo, even if the foreground subject is not very special. For a WAM photo, golden sunset rays, the silhouette of a jetty, or a nice fan coral background can be more important than the foreground subject. I often try to find a nice background first, and then look for subjects that fit into that background.
Starfish under a jetty in the sunset, Western Australia. Canon PowerShot S95, UWL04 wide-angle lens
Camera Settings
WAM is best performed with manual settings both on the camera and on the strobes (see lighting section below). You can control the light on the subject with strobe power, but you cannot control the ambient light of the surroundings. This is why I always start by taking a photo of the surroundings first, without flash.
You’re going to want to expose the naturally lit background similar to how you’d do a normal wide-angle shot. The only difference with WAM is that since you’re so close to the foreground subject, you want to retain as much depth of field as possible. For compact cameras, I recommend starting with the smallest aperture (usually around f/8) and adjusting the shutter speed to achieve the desired exposure.
Next, you can start playing with strobe power to expose the subject. I set my focus mode to spot focus, so the camera focuses on the subject and not the background. If the background is soft or out of focus, the photo can still succeed, but your image won’t work if the foreground subject isn’t sharp.
Scorpionfish, Ambon, Indonesia. Panasonic Lumix DMC-GH4, 8mm lens, 3.5” dome, snooted
Lighting
Lighting your subject properly is the main challenge of WAM. Since your camera is positioned so close to the subject, it becomes difficult to light both the subject and surrounding environment properly. Again, as with the camera, bigger is not always better when it comes to wide-angle macro. Using compact strobes (like the Inon S-2000 or the Sea and Sea YS-D1) makes the challenge a little easier because they are less cumbersome and intrusive.
Similar to CFWA, you'll want to think of the frame as having two exposures. The first is the foreground, which will be illuminated by the artificial light coming from the strobe. The second layer, the background, is illuminated by ambient light—adjusted through the combination of shutter speed, aperture, and ISO. You’ll want to pull your strobes in tight next to your lens, but slightly behind to avoid backscatter or accidental flaring.
You can further reduce the risk of backscatter by turning the strobes away from the subject and just hitting them with the edge of the strobe light. In clearer conditions, you can try positioning your strobes further inward to create more contrast (side lighting) to separate the foreground even more from the background. More information on lighting close-focus wide-angle can be found in Alex Mustard’s informative tutorial.
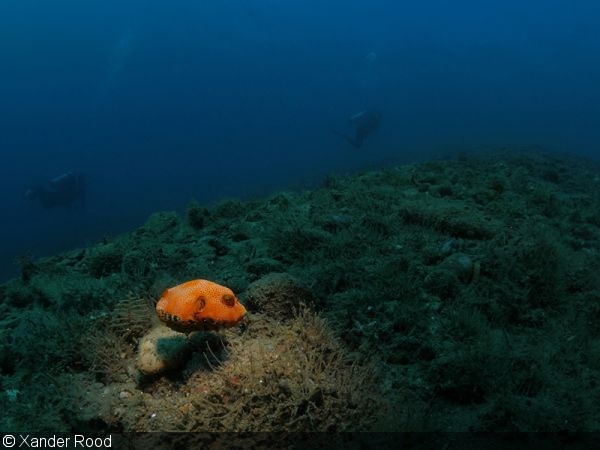
Pufferfish, Ambon, Indonesia. The beam of light from my snoot makes this small juvenile stand out of its surroundings. Panasonic Lumix DMC-GH4, 8mm lens, 3.5” dome, snooted
For more advanced shooters, “snooting” can also give nice results. Here, a light modifier allows the photographer to control the diameter and direction of the light. This technique can be useful to limit backscatter in low-visibility conditions, or selectively light just the subject in the frame. Snooting with WAM is actually easier than with traditional macro, since you know right where to aim the beam—right in front of the dome.
Conclusion
Wide-angle macro is one of those few techniques more easily accomplished with compact cameras than high-end DSLRs. The compact’s small size, combined with a fisheye wet lens, allows the photographer to capture traditional macro critters while also including an intriguing background. Next time you’re out diving, try looking for pleasing backgrounds first, and then a nice macro subject to fit in the frame. Once you give this technique a try, there’s every chance you’ll become addicted to getting that perfect shot.
Pink frogfish trying to blend in on soft coral, Ambon, Indonesia. Panasonic Lumix DMC-GH4, 8mm lens, 3.5” dome
RELATED CONTENT
Featured Photographer


